SEO Tips: Use Google Trends to your advantage

Do people search for your keyword? Are you worried you are not getting the most out of your SEO campaign?  Part of the reason why SEO campaigns don’t work is that they could be not targeting what the customers are looking for.
Keywords could get “obsolete” in a sense that there could be newer but related keywords that are not in your web page.  Users using Google to search relevant web pages could miss your web site if they used the more recent keyword but not your keyword.
So how will you know if your keyword is still in the trend of searched keywords?  Well, Google trends from Google labs is now online for you to use, still on its early beta-stage as of this writing but still pretty usable for our purpose.
Step 1: Go to the main interface: http://www.google.com/trends
Step 2: Enter the keywords you want to study. In this case, I want to compare keywords of Drum manufacturers: Ludwig, Pearl, Sonor and Gretsch:
image
Step 3: Click the Search Trends button to generate the trend chart (you should see a similar looking page like below):

SEO Tip: Google Insights for Search

We have shown you here how to use Google Sets and Google Trends.  Now from Google’s Tel Aviv team comes the Google Insights for Search which is currently in Beta stage:  http://www.google.com/insights/search

image

Basic WordPress SEO

Today I am going to look at some very basic first steps in making sure that your band new shiny WordPress installation is search engine friendly. I am going to talk about just two things, but these are very important things, the most fundamental and arguably the most valuable from an SEO viewpoint.
Firstly we are going to talk about permalinks. When you first install WordPress, your permalink structure will create a page URL for your posts and pages that looks something like this:
http://www.yoursite.com/?p=123
This is far from optimal, we really need to change this to something that contains some tasty and readable information for the search engines to devour. So we will make some changes to have them look like this:
http://www.yoursite.com/category/post-name/
To do this, find the permalinks section of your blog options and make the changes in the screenshot below. Before doing so, make sure you .htaccess file has write permissions set, don’t forget to change it back afterwards!

permalinks

Ultimate Keyword Analysis For Articles

I am sometimes overwhelmed by the amount of content online – and I wondered – how much of this content is keyword optimized? In a recent quest to find the best article keyword density analyzer, I found a lot of sites that allow you to analyze your web pages, but not many that allow you to analyze the text PRIOR to posting it online. However, there was one gem in the vast array of so-called keyword density analyzers (http://www.live-keyword-analysis.com).

Get keyword ideas using the Google Keyword Tool

Search engines use keywords to identify which sites match a particular search phrase.  SEOs need to identify which keywords are searched for so that they can use those keywords and get found by the search engines and eventually by their target audience. 
For example, if you want to optimize a website about “computer tips” you should see how many searches for the keyword are being submitted to Google monthly so you can have an idea if readers are looking for you or not. You can do that by going to external Google Keyword Tool:
Enter the keyword or phrase that you want to analyze then click Get keyword ideas:
image
You will see a tabular report of all related terms along with the search volume generated for the previous month and the average search volume.

Free Search Engine Optimization (SEO) Software by WEB CEO

In today’s article I am going to discuss a SEO software package that has become invaluable to me in recent months. It is an all-in-one SEM/SEO tool named WEBCEO and it is quite frankly the best SEO optimization tool I have ever used. And above all it is completely free! There is a paid version but everything I will show you here is possible with the free version.
I’m not going to talk about on the page optimization and search engine/directory submissions although the software does perform these functions. What I am going to go over today is using WEBCEO as a tool in an ongoing SEO project, I will cover the three areas of main concern for any SEO head when trying to monitor off the page issues affecting SERP. Namely keywords, rankings and back links.

web ceo

How to write blog post titles while keeping SEO in mind

How many times do you happen upon a post written by a fellow blogger whose title makes you wonder what the post will actually end up being about? Note that many times that you do run across these posts, they do not have a high PageRank or get very much traffic unless they have been Dugg, etc. And even if they do, could they get more traffic if their post title was optimized?
When I first starting writing for my blog in March of this year, I didn’t even know what the term SEO meant and hence wrote post titles that would make a seasoned blogger cringe! Even though I have read it over 100 thousand times, it seems that a lot of bloggers out there still don’t understand how important it is to write a good title for each post.
And what’s more baffling is that everyone intrinsically knows how important titles are because each person reads a newspaper on a daily basis. For example, if you were to whip open the New York Times web site right now, the top headline is as follows:

New Stem Cell Method Could Ease Ethical Concerns
Now that title makes sense! It’s also very search engine friendly since it’s short, yet has enough keywords that it would show up in a long tail search. Now consider what you would think if you were to read the following headline:
“Medical Ethics”
If that were the title for the above article, do you think it would be as easily searchable through Google as the first title? HELL NO. And you may read this and laugh and say that “Awww come on man, that’s retarded, that title is not even close to being a short form of the original title, it’s not close at all!” Well I would agree with you, but that’s a major problem with many blog post titles, they have nothing to do with the content!
As a technology blogger myself, I find this issue to be even worse among our niche because most bloggers are writing about software, computers, technology, and other items whose names don’t have anything to do with their ultimate purpose.
For example, here’s a couple of blog posts that I feel are really bad post titles because they lack keywords, do not describe anything, and are just plain useless to the search engines.

SEO tips from Matt Cutts that every blogger should know

About three weeks back, Google search engineer Matt Cutts gave a very informative presentation at WordCamp 2007 about what web site owners and bloggers (especially WordPress bloggers) could do to make their sites more SEO-friendly. You can check out the post by Matt here to read more or watch a video of the presentation.
Here are a couple of the basics that I got from the video and written transcription of the talk:
  • Use plugins like Akismet or Math Comment Spam Protection to protect your blog from spammy links, etc that could hurt you.
  • Place the Google Analytics code lower in your WordPress template, preferably in the Footer.php section. Moving the script code from the header into the footer will allow your page to load faster. You can put it anywhere in the footer file as long as it’s before the </body> tag.
  • Replace the default Feedburner Feed with your own custom branded feed hosted off your own domain.
  • Install an SEO title plug-in that will swap the name of your blog with the post title first. If your blog’s name is still first and then the post title, make sure you install something like Optimal Title immediately.
  • Install and use WWW Redirect, Permalink Redirect, and Related Posts plugins if you have not already done so. The first plug-in will ensure that typing in your site with the WWW or without it will lead to the same place, whichever you choose. The second ensures that your post URL with or without a trailing slash works correctly. Lastly, Related Posts will include a list of other similar posts at the bottom of each post, thus helping maintain good internal link structure.
  • If you’re just starting your blog, make sure you don’t put it at the root of the domain. Create a subdirectory called “blog” (not “Wordpress”) and use the root of the domain as an entry point with a link to your blog.

Check your PageRank, rating, backlinks, and website using Xinu

Here’s a nifty tool that you can use to check your web site’s important SEO-related stats such as PageRank, links at social book-marking sites, indexed pages for the top search engines, and number of backlinks. This tool is targeted more towards helping your site overcome insufficiencies that you might have when ranking with search engines.
Xinu is a very simple to use, yet comprehensive tool to diagnosis or analyze a web site. It’s also a good way to get an idea of how your site compares to other sites in your niche.
Once you type in your domain name, check off the elements you want to see, and then click GO. You’ll first get an analysis of your URL, the Title tag of your web page, the keywords, the description, and the size of the HTML document.


Website Grader – A free search engine optimization (SEO)/marketing tool

f you have your own web site or blog, it’s always good to know where you can improve the SEO aspects of your site so that you rank better in the SERPs. There are a few good tools out there that you can use to get specific recommendations for your site. I really like Website Grader because it checks many aspects of a site’s overall ranking including the site structure, meta tag usage, head tag usage, image summary, age of the domain, Google PageRank, Alexa rank, Technorati rank, readability of site, and inbound links.

Another cool thing you can do with this tool is add in a couple of competing web sites and see how well your site is doing compared to theirs! A great way to see how you can make yourself catch up to the competition. You can also put in some related keywords and Website Grader will tell you how you rank for those particular keywords.

SEO’s please help me!? Should I try this crazy shit with my blog!?

Ok, I’m in a bit of a situation here and I need some serious SEO help!! Here’s what I’ve done…I decided to create a blog on Blogger Beta back in March and stupidly did not read about other blogger tools like Wordpress, etc that have more features and that can be used on your own domain name (I know Blogger allows this too, but I was dumb and didn’t know back then that a custom domain name is far better in terms of SEO).
So I started writing lots and lots of posts, but I was using the new label feature in Blogger completely wrong! Instead of making categories like Windows or MS Office, I was typing in full sentences like “Learn the basics of Excel” and only later on did I realize that if I wanted people to get to the posts easily, the labels were supposed to be like categories (I was thinking they were like keywords and I should put lots of keywords in there!!)…
So what did I do?? In the middle of April after writing more than a hundred or so posts, I went through each post and changed the labels so that they were aligned with categories and then I added that to the side menu of my blog! BAD IDEA!!! Google didn’t like this very much and suddenly most of my pages went to the supplemental index, even though they were all in the main index before I changed all the links.
And now it’s pissing me off because more than half my site is supplemental because of changing the internal link structure to make it easier for people to view my blog!!! So I’ve tried to do some research and I’ve come up with this idea…
1. Use meta tags (noindex, nofollow and noarchive) to try and get all my pages out of the index.
2. Then use the Google URL removal tool to take my whole site out of the index also.
3. Switch over to Wordpress after everything on the original blog is out of the index.
4. Delete the blog on Blogger and hope that my pages on the new site get re-indexed and that I don’t get penalized for duplicate content (which would send me right back into supplemental) because all of the original pages are gone.
How does this idea sound!?!? My blog is not that popular or anything and it’s only been around for about 2 and half months, so I’m thinking it’s a good time to try it. Unfortunately, I have a page rank of 4, but I’d rather have all my pages indexed and regain my page rank than sit here and keep writing shit that will only end up in the supplemental index!!!
SOMEONE TELL ME THE BEST WAY!! I need some hardcore SEO people…spare a minute please!
[tags]seo, moving from blogger to wordpress, switch blogging platforms, blogger to wordpress[/tags]

Windows 7 Cannot Connect to Internet

Having problems connecting to the Internet on your new Windows 7 machine? Windows 7 is great and can automatically fix a lot of common problems related to connecting to the Internet, but not all!
The first thing you should try if you having Internet problems is to try and connect from both a wireless and wired connection. You first want to try and narrow down the problem to Windows 7, to your network setup, or to your Internet provider.
Here are some possible solutions you can try that will hopefully get your Internet connection up and running in Windows 7.

Method 1 – Turn Off Firewall/Anti-Virus Programs

One common reason why this problem occurs in new installations of Windows 7 is because of a third-party firewall or anti-virus program. Just to make sure it’s not that, go ahead and uninstall any of these types of programs.
You might be wondering why it would matter, especially if you have the same program running on another computer like XP or Vista. The problem could be that if the firewall or anti-virus program is not compatible with Windows 7, it can accidentally block connections to the Internet.

Method 2 – Install Drivers in Emulation Mode

So if you didn’t buy a new computer and are instead installing Windows 7 on a slightly older machine, you problem could be because of incompatible drivers.
You can fix this in two ways. First, try going to the computer manufactures website and download the latest drivers for your wireless card. Install it and see if the problem is fixed.
If not, it might mean you need to install the driver in compatible mode. You can do this by right-clicking on the executable file, choosing Properties, clicking on the Compatibility tab and checking the box that says “Run this program in compatibility mode for:” and then choose the OS.
windows 7 cannot connect internet

How to Run a Power Efficiency Report in Windows 7

Windows 7 has some pretty cool new features and one of those is the energy efficiency report. What’s that you ask? It basically lets you find out what is eating up all your battery power and analyze the efficiency of your computer.
So how can you run this report? Well, first you need to make sure you run it when your computer is idle and you have exited all programs. Now start an elevated command prompt in Windows 7.
You can do this by clicking on Start, then typing command prompt into the search box and right-clicking on Command Prompt and choosing Run As Administrator.
windows 7 energy report
Now type the following command at the prompt:

How to Create a System Repair Disc in Windows 7

We have previously shown you how to create system restore points in Windows 7 and now we will show you a way to recover from a more serious error – like when you can’t even access the System Restore screen.
System recovery options can help you repair Windows if a serious error occurs, such as corruption of the OS. To use system recovery options, you’ll need a Windows installation disc or access to the recovery options provided by your computer manufacturer. If you don’t have either of those choices, you can create a system repair disc to access system recovery options.
To start making system repair discs, go to the Control Panel then click the Backup and Restore icon. In the Backup and Restore window, click the Create a system repair disc link at the left side.

image

How many computers can you install Windows 7 on?

One common question that I get all the time is “How many computers can I install Windows 7 on?”. If you read around, you’ll hear everything from 3 copies on 3 different computers to nothing!
Well, it all depends on what version on Windows 7 you have! You can either have a pre-installed copy that came with your computer, you can buy a retail version, or you can buy a Family Pack.
windows 7 how many computer

Windows 7 – How to use Windows Anytime Upgrade

So you decided to try out Windows 7, but didn’t want to blow up any extra money in case it wasn’t worth it right? Most people will buy either the Home Premium or the Professional edition of Windows 7 at first.
However, you may decide later to upgrade to a higher version of Windows 7, like the Ultimate edition. You can read my previous post on 6 reasons to upgrade to Windows 7 Ultimate.
So if you have decided to make the move from Starter to Home Premium, Home Premium to Professional, or Professional to Ultimate, how do you go about doing it?
Also, note that you can upgrade from Starter to Ultimate, there is no need to go in order. You can currently upgrade a 32-bit version to another 32-bit version and same for 64-bit, but you cannot upgrade from a 32-bit OS to 64-bit.
One other major thing to note is that once you upgrade, you can’t go back to your previous edition without doing a full reinstall. This really should not be a big issue, but it’s good just to know.

Upgrade Windows 7 using Windows Anytime Upgrade

Click on Start, then type in anytime upgrade into the search box and click on Windows Anytime Upgrade to get started.

Managing Disk Fragmentation in Windows 7 with Defraggler

When is the last time you defragmented your hard drives?  Perhaps you have set yourself a reminder to do it once a week, or month.  You may have purchased something like Diskeeper, and this problem is taken care of automatically.  There is also the possibility that you do not know how to defragment your hard drives.
Traditionally, the built-in defragmentation tool for Windows was used for once and a while runs, or when one remembered to do it.  A few commercial tools took note of this and created their line of software tools to automate the process.  Microsoft has since added the ability to create or change a scheduled defragmentation run, through the Windows graphical user interface, in Windows Vista and 7.
The long and short of Windows defragmentation is that your defrag runs begins, and then you go do something else, away from the computer (with the exception of commercial software designed to run in parallel to normal Windows operation).  This is easily accomplished if you have it set to run late at night, or manually start the process before you are off to bed.  But what if you had more control over your defragmentation, without the cost of commercial software?
Defraggler (found here) comes across as a happy medium between the Windows defragmentation tool, and commercial grade software.  Though it does not run constantly in the background, if offers functionality above the Windows utility.  Though the main graphical view for Defraggler has the standard Analyze and Defrag buttons, the display yields more information than the standard Windows view.

defrag1
Defraggler does show the information about your computer’s hard drives.  In the main display you can see Used and Free space, and Fragmentation levels (expressed as how fragmented your drive is, by percentage), if an analysis was run.  Additionally, the main screen has an area displaying capacity, of the currently selected drive, in pie chart format.

Cannot Access Your DVD Drive After Installing Windows 7?

So you just installed Windows 7 on your home computer and are happily going about enjoying the new operating system until you suddenly find out you are no longer able to access the DVD drive!
Unfortunately, there are certain DVD drives that have issues with Windows 7. The DVD drives will stop functioning altogether. Luckily, there are a few ways to fix the problem so that you can continue using the same DVD drive with Windows 7.
dvd drive not working windows 7

How to Adjust the Font Rendering in Windows 7

Is it hard to read the text on your new Windows 7 machine? Is all the text looking a little fuzzy and giving you a headache? If you have any of these issues, you may have to calibrate your display for rendering text.
By default, Windows 7 enables ClearType, which is software technology that is supposed to help improve the readability of text on LCDs and flat panel monitors.
To tune or adjust the way fonts render on Windows 7, click on the Start orb, then type in cttune.exe. This is the ClearType Text Tuner.
windows 7 font rendering

How to Mount a Virtual Hard Disk in Windows 7

With Windows 7, you now have some cool options for backing up and restoring your computer. I’ve previously written about backing up your computer using the built-in backup tool in Windows XP, but the new version is way better.
In Windows 7, when you perform a backup of your computer, the backup software will create a virtual hard disk file (VHD). If you have used Virtual PC 2007 before, you’ll know what I’m talking about.
You can also read my previous post on how to convert your PC into a virtual machine easily. Once you have a VHD file of your PC, you can load it up in Windows 7 and access the data just as if it was another drive on your computer.
Note that you can also use that VHD file to restore your entire computer to a previous state, but what if you just need some files or folders from a backup? Mounting a VHD backup in Windows 7 makes it really easy to copy data back and forth from the virtual machine.
To mount a VHD in Windows 7, you have to open Computer Management by clicking on Start and typing in compmgmt.msc in the search box. You can also go to Control Panel, then System and Security, then click on Administrative Tools and then click on Computer Management.
windows 7 mount vhd

Windows 7 Color Calibrate – How to Calibrate your Monitor

Depending on what kind of monitor or screen you are using, you may have to calibrate your display to get the proper color settings. Calibrating is highly recommended even if you think everything looks wonderful.
You can calibrate your display in Windows 7 using the Display Color Calibration wizard. You can get to this by going to Control Panel, clicking on Appearance and Personalization and then clicking on the Display header. Then click Calibrate color in the left menu:
calibrate color windows 7

Windows 7 – How to Troubleshoot Problems with Aero Peek and Aero Shake

Windows 7 has some cool new features like Aero Shake and Aero Peek. Aero Peek is a quick way to see what’s on your desktop by simply moving your mouse to the right edge of the taskbar.
You can also quickly bring up another program to the front by moving your mouse over the thumbnail preview in the taskbar. Aero Shake is a nifty feature that lets you shake a window and automatically have all other open windows minimized. Shake it again and all the windows come back.
Lastly Aero Snap lets you quickly resize windows by dragging them to the edges of your computer screen. Depending on where you drag it, you can make the window full screen, expand vertically, or appear side-by-side with another window.
If Aero is not working properly on your Windows 7 machine, you can use the Aero Troubleshooter to try and fix the problem.
First, click on the Start button and then type in aero. Now click on the Find and fix problems with transparency and other visual effects link.
troubleshoot aero

Windows 7 – How to burn CDs, DVDs, and Blu-ray discs

Windows 7 comes with it’s own Explorer integrated CD/DVD burner.  We have shown you before how to create DVD movies using Windows 7 movie maker, but this time we will look at it’s capability to burn generic files.  Creating data discs in Windows 7 is very intuitive.
Pop-in a blank DVD or CD and it will automatically prompt you with the “burn a disc” window.  The default disc title appears as the current date and you will have two options to choose from – like a USB flash drive or with a CD/DVD player.

image

The Network and Sharing Center in Windows 7

Windows 7 offers a very user friendly interface to connect computers to the network.  If you’ve previously set up a home network using computers running Windows XP or Windows Vista, you’ll find that setting up a network with a mix of computers running Windows XP, Windows Vista, and Windows 7 is similar.

image

Does your Windows 7 computer display turn off every 15 minutes?

A recent issue I’ve seen on a few Windows 7 machines has been the display turning off after only 15 minutes, even though I set the Turn off the Display option to Never. Weird!
This usually occurs with a new install of Windows 7 and will result in your computer screen turning off after 15 minutes of idle time. This can occur for one of two reasons: either it’s the first time you started Windows 7 or because the WinSAT score has not been calculated yet.
WinSAT stands for Windows System Assessment Tool is used to calculate the Windows Experience Index (WEI). For some reason Windows continues to count the idle time even if you change the active power plan.
You can fix this problem by resetting the Turn off the display option. Here’s how you do it.
Click on Start, then Control Panel and then Hardware and Sound, and then click on Power Options.
windows 7 power options

How to Customize the System Tray in Windows 7

In Windows 7, the system tray is now called the Notification Area, which is just a fancy term for all those little icons at the bottom right of your taskbar. Just like you could customize the system tray in Windows XP, you can also customize the notification area in Windows 7.
There are two ways you can manage the notification area: either by dragging and dropping icons or by using the Control Panel settings.
What I like about Windows 7 is that it’s super easy to control which icons show in the notification area and which ones are hidden. By hidden, I mean that you have to first click on the small up arrow to see the hidden icons.
To show an icon in your system tray, click on the up arrow and then drag the icon you want into the notification area.
windows 7 notification area

How to Setup Dual Monitors in Windows 7

Windows 7 has some neat little enhancements, one of them being how it lets you handle dual monitors. If you’re adding a second monitor to your Windows 7 home or office PC, which is a very good idea, it’s a breeze to configure.
There are actually two ways you can currently setup multiple monitors in Windows 7, either by using a keyboard shortcut or via the traditional system properties.
I really like the first method since it’s new and is way easier than having to go into the Control Panel or anything else.
Simply press the Windows key and P (Windows + P) to bring up a quick menu of options.
dual monitors windows 7
Pretty neat! You can pick to show only the computer, make the second monitor a duplicate of the first, extend the desktop to the second monitor or turn off the first monitor and activate the second.
The second way is to right-click on the desktop and choose Screen resolution.

Windows 7 – Share Internet connection with other computers

If you have recently purchased a new laptop with Windows 7 installed, you’ll be happy to know that you can convert your machine into a mobile WiFi Hotspot! Using some cool free software, you can take any Internet connection and share it wirelessly!
Connectify is the name of the app and it’s currently in beta testing, though you can download and use it.

windows 7 wifi hotspot
What’s neat about this application is that it actually created a full-fledged WiFi Access Point on your Windows 7 machine, not just an ad hoc type of network.
Also, the software-based wireless router uses WPA2-Personal (AES) encryption, so your security namely depends on the passphrase that you decide to choose when setting up the new wireless network.
Basically, after you install it, you should see a new Connectify icon running in the Notification area. If not, you can click on the up arrow and then drag the Connectify icon to the main notification area.
connectify windows 7

Use Problem Steps Recorder to get Tech Support for Windows 7

One really cool new feature of Windows 7 is the Problem Steps Recorder app. Basically, it’s a built-in tool that lets you record screenshots of your desktop along with details and descriptions of all actions that you performed.
These recordings are then saved as archived web pages (.mht) files that you can then send to Microsoft or your friends for technical support. It’s really a very convenient way to quickly show someone the problem you are having with your Windows 7 machine.
To use Problem Steps Recorder, click on Start and type in psr.exe in the search box. Then click on psr.exe in the Programs lists.
problem steps recorded

6 reasons why you should buy Windows 7 Ultimate

We all know that Windows 7 came out with a slew of different options and although all versions contain the same integrated basic applications and many of the same multimedia features, the Ultimate edition includes greater security and emphasizes the needs of more demanding users.
Let me list down the exclusive features of the Ultimate edition and see if it is worth the money.

image

Windows 7 – Enable or disable hibernation

In Windows 7, if you want to enable hibernation, it’s not as easy as it used to be in Windows XP. Now if you go to Power Options in Windows 7, there is no longer any tab for Hibernate.
In Windows 7 actually, there is not even a mention of hibernation, only the new Sleep mode.
You can enable the hibernate option in Windows 7 in two different ways, either via the Power Options dialog or via the command prompt.

Enable hibernation Windows 7 via Power Options

If you go to Control Panel, click on Change when the computer sleeps.
enable hibernation windows 7

How to use the Windows 7 Snipping Tool

Screen capture programs have been a longstanding software need for Windows users.  Anyone who wanted to show a “how to” instruction set, compare Desktop screens, or various other reasons, found themselves in the market for the ability to take screen shots.  With Windows, one can use the Print Screen function, paste the image into Paint, and then edits the screen image.  However, doing this in repetition proves cumbersome and time consuming.
Between free and paid solutions, there is a vast selection of screen capture tools available on the Internet.  The average person is bound to try at least more than one before settling on a package that fits their needs.  Microsoft took note of this and added a function to Windows 7 to cover the basic needs of quick screen capture.
Located in the default Start menu, the Snipping Tool encompasses some basic functionality of what a screen capture tool should have.  It can capture a rectangular area, an active window, a full screen, as well as a freehand type capture (non-predefined shape).  With its companion editor function, you do not have to open up an external program like Paint to edit your screen shots.
To illustrate the use of the Snipping Tool, we will run through a capture from start to finish.  To begin this process, open up the Snipping Tool from the Start menu.  You will now see a small graphical menu pop up on your screen.

win7snip1
In this small menu selection, you will see New, for a new screen capture, and Options, for choosing certain attributes about how the Snipping Tool will act.  Before we take a new “snip”, let’s look at the Options briefly.  Here we can control items like ink color (if using the Free-form or Rectangular Snips), prompt for saving Snips, and copying Snips to the Windows Clipboard.

From Windows XP to 7, The new Start Menu

For those of us who held fast to XP, moving to the new Windows 7 operating system presents various challenges.  Whether it is your average home user type person, or groups of employees in a business setting, migrating from Windows XP to Windows 7 is not a walk in the park.  From locating files and folders to acclimating to the new graphical interface, there is a learning curve between the old and the new.
The updated type of graphical interface changes to the Windows operating system were first seen in Windows Vista.  The Start button was replaced by a Windows logo ball shaped icon (we will call it the Start ball).  Instead of a few choices appearing after clicking on Start, the user was presented with many more choices with Vista.  Gadgets appeared on the desktop screen, showing time, and picture slide shows.  For XP users, this took a little getting used to.
For those who have muddled through Windows Vista, the Start menu in Windows 7 is not a huge leap in differences.  However, for XP users, Windows 7 presents new graphical oddities that may take time for familiarization.  With that in mind, this may help people get their feet wet with the new Windows 7 Start menu.

win7sm2
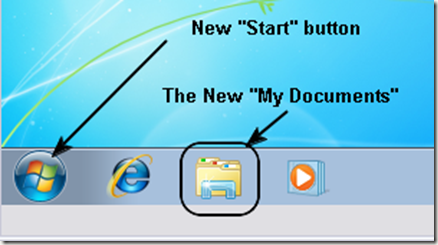
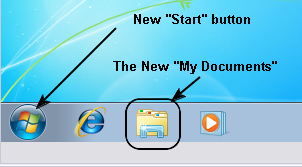
With the default layout of the Windows 7 desktop, the user is greeting with four icons in the lower left-hand corner.  As previously mentioned, the Windows logo has replaced the old Start button.  Internet Explorer and Windows Media Player (blue block with white arrow icon) are located to the right of the the Start ball.  Additionally, there is an icon link for what was previously the My Documents folder.
win7sm5
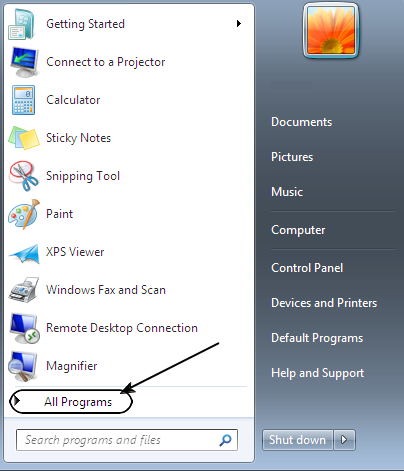
Clicking on the Start ball brings up a menu with many more choices then Windows XP.  Here we have access to Documents, Pictures, Music (historically preceded with the word My), All Programs, and the Control Panel; as was the case with XP.
Though now, we can more quickly access things like Paint and Calculator, where before you had to dig through All Programs, and then Accessories.  I know, not a massive change, but just the tip of the iceberg.
win7sm6
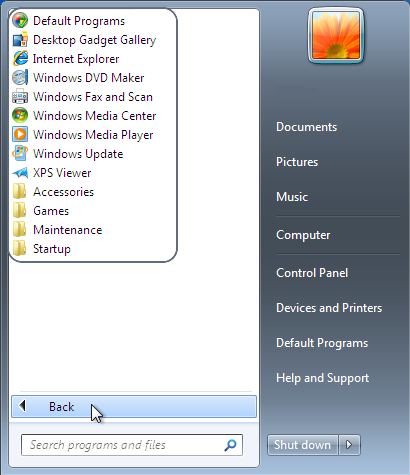
With the new version of Windows, clicking on All Programs does not shoot out a menu to the right.  Rather, the menu selections appear within the Start menu.  Again, the navigation path has been shortened, but by just a little.  Clicking on Back will return you to the default Start menu view.
win7sm7
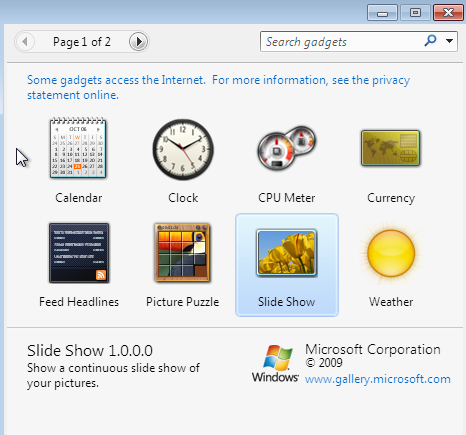
Since the All Programs section has a link to the Desktop Gadget Gallery, we will click on that and look at it briefly.  Windows 7 includes a small set of gadgets to place on your Desktop.  These can be further narrowed down by using the search bar in the upper right hand corner on this window.
win7sm8
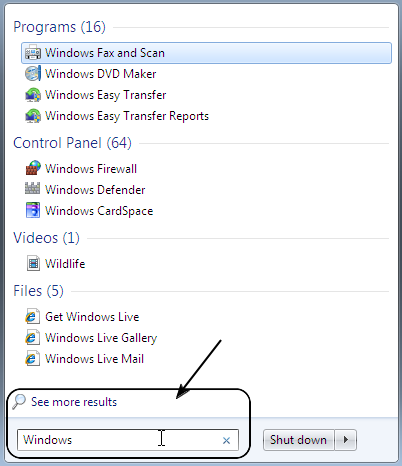
Keeping the search bar from the Desktop Gadget Gallery in mind, we will move back to the Start menu.  There is a search bar here as well, and if you being typing something into it, the area above the search bar will transform into a search results screen.  In this example, the word Windows was entered.  The results of this search showed items which are programs, files, and even Control Panel options.
win7sm9
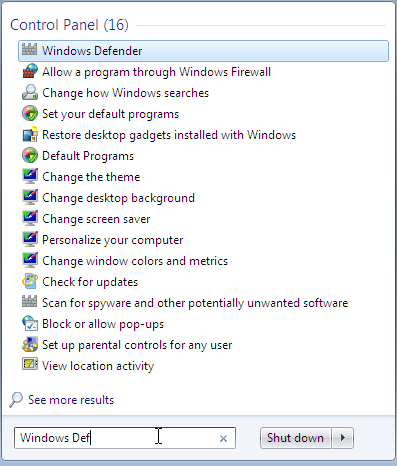
As we type additional words into the search bar, the displayed results begin to narrow in scope.  Since we added the partial word of Def, Windows guesses that we may be looking for Windows Defender and moves it to the top of the list.  It also continues to populate the results screen with other available choices.  This is a rather handy feature, though it may take Windows XP user a few trial runs before feeling comfortable.
win7sm10
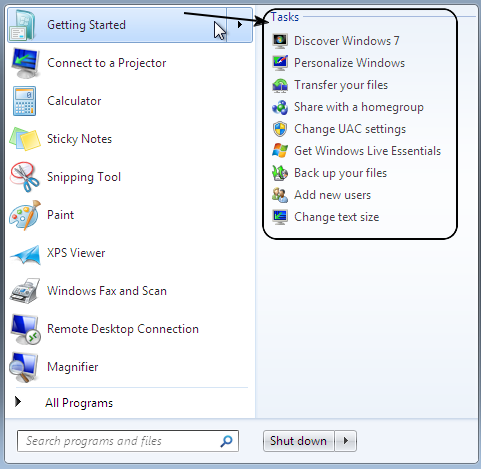
Similar to the Welcome Center in Vista, Windows 7 has what is called Getting Started in the Start menu.  This selection covers a quick list of topics on how to being using Windows 7.  This group of tools and menus will help an XP user become accustomed to working with the new operating system, though further practice with Windows 7 is needed to further understand the myriad of new options.
win7sm10
The new Start menu is only part of what Windows 7 has to offer.  But this is the first thing that XP users will likely gravitate to in the new graphical desktop interface.  As with any new system of this type, trial and error and studying related documentation will play a large part in migrating to Windows 7.

Windows 7 taskbar disappearing?

A new issue I’ve seen going on with some Windows 7 users is that their taskbar will suddenly disappear completely. The only thing that remains is the Start Menu button/orb.
Here’s an example of a desktop in which the Windows 7 taskbar just vanished:

windows 7 taskbar missing
That’s pretty crazy right! Not only that, if you right-click in the area where the taskbar is supposed to be, you get the context menu for the desktop, as if it’s totally gone.
There are some possible solutions out there for this problem and I’ll try to list as many of them so you can get your taskbar back in Windows 7.

Revert to the classic Start Menu in Windows 7

So you just purchased a new Windows 7 PC, but don’t like the new start menu? In earlier version of Windows, you could easily go back to the Classic Start Menu by simply going to the properties of the taskbar and choosing that option.
image
In Windows 7, however, there is no way to revert back to the Classic Start Menu, they have simply removed it completely.

How to personalize Windows 7 RC’s desktop themes

Windows 7 RC is a gorgeously good looking operating system.  In this post I will show you how to personalize in detail the Aero themes supported by this new Windows version.  By default, the release candidate displays what looks like a fighting fish on a traditional blue background.

Create home DVDs using Windows 7’s DVD Maker

Windows 7 by default comes with a DVD Maker software.  Home users will particularly like this tool since it lets them burn DVD movies using their own media like home made videos and digital photos.
The quickest way to make a DVD is to add pictures and videos in Windows DVD Maker, and then burn to a blank DVD. If you want to get creative, you can customize the DVD menu style and text before you burn the DVD.
To open DVD Maker, click the Start button and choose Windows DVD Maker:

How to show your computer name in the Taskbar in Windows 7

One cool tip that I read today on Scott Hanselman’s blog was about Windows 7 and how you can add the computer name to the taskbar to make it easy to identify which computer are you.
When I read it, I thought how simple it was to do this, yet how I never even thought of it before! However, adding the computer name to the Windows 7 taskbar is absolutely great because if you are running multiple virtual machines, it’s hard to remember which one you’re currently on.
You normally either have to check what is installed on the computer or check the computer name manually to figure out which computer you’re working on.
Here’s how you can setup to show the computer name on your Windows 7 taskbar:
Step 1: First, go the Documents folder and create a new folder there with the same name as your computer name. You can find your computer name by right-clicking on My Computer and choosing Properties.

Best online resources for Windows 7

As you probably all know, Windows 7 was released yesterday to the public! As with any new operating system, there are new features and different ways of doing things.
Windows 7 has some cool new features like Snap, which lets you compare two files side by side, Live Taskbar Previews, which lets you see all open windows for a program right from the taskbar, HomeGroup, which lets you easily share files and printers across multiple computers on a home network and AeroShake, which lets you organize windows more efficiently.
On top of all that, Windows 7 is just a lot faster and works with all devices and programs that Vista was compatible with. If you just bought a new computer with Windows 7 or you plan to upgrade Windows Vista to Windows 7, then check out the following list of resources to help you setup and configure Windows 7.

How to automatically rotate wallpapers in Windows 7

Windows 7 has some cool new features, some of which I discussed in a previous post detailing Windows 7 features. One of those features that I had not discussed was the fact that it now has a built-in tool to rotate wallpapers on your Windows 7 desktop.
In this article, I will walk you through the steps for setting up your Windows 7 desktop to automatically change wallpapers at specified time intervals.
First, go to Start and then Control Panel. Now click on the Personalization link or click on the Appearance and Personalization category and then click on Change desktop background.

Windows 7 – “Compatibility report – these programs might not work properly”

Now that many people will be upgrading their computers from Windows Vista to Windows 7, you also start seeing problems! Even though Windows 7 is way better than Windows Vista in terms of compatibility with hardware and software, there are still some programs that will fail.
For example, when performing an upgrade, you might get the following error message either before or after the upgrade completes:

These programs might not work properly after the upgrade. We recommend uninstalling these programs before upgrading. Cancel the upgrade, open Control Panel and search for uninstall a program.
This program has known compatibility issues… Windows Live OneCare is incompatible with this version of windows. For more information contact Microsoft.
You will definitely get this message if you were using Windows Live OneCare on Vista. Unfortunately, this program is no longer compatible with Windows 7.

How to restore a folder’s previous version in Windows 7

In Windows 7 there is a new feature that will let you restore previous versions of the contents of a folder.  For example, if you have a folder containing some files from last week, then you update the contents of the folder this week, you can still go back to the old version of the files.
This new feature is called restoring previous versions.  Previous versions are either copies of files and folders created by Windows Backup or copies of files and folders that Windows automatically saves as part of a restore point.
You can use previous versions to restore files and folders that you accidentally modified or deleted, or that were damaged. Depending on the type of file or folder, you can open, save to a different location, or restore a previous version.
Note: If you modify a file several times in one day, only the version that was current when the restore point or backup was made is saved as a previous version.
To restore from a previous version, right click a folder then choose Restore previous versions.

What’s new in Windows 7 RC’s taskbar

Windows 7 release candidate has arrived.  I have it installed on my desktop and just like the previous releases – I had no problems with the installation.  The installation experience is much easier than Windows XP or Vista.  I only needed to choose if I want to upgrade or install a new Windows 7 system.
Then you need to choose which disk partition you want it to be installed and then that’s it!  The installation wascompleted in less than an hour.

How to use Aero Flip 3D and Alt-Tab in Windows 7

Aero Flip 3D was first introduced in Vista.  With Aero Flip 3D, you can quickly preview all of your open windows (for example, open files, folders, documents and programs) without accessing the taskbar. It displays your open windows in a visually pleasing stack.
image
To use Flip 3D, click and hold the Windows button together with the tab key.  As you hold the windows button press the tab key to rotate the stack.  This will move the windows in a queue so you can see all of your windows in sequence.  Once you see the window that you want to view, release the windows button.  The window when you release the windows button will be the active window.
Alt-Tab on the other hand will show the opened windows too, but in a different visual presentation.  Instead of a 3D stack, it displays the each of the windows’ thumbnails.  On Windows XP, Alt-Tab displays the icons of the programs instead of thumbnails. You can switch between windows by continually pressing Tab while holding Alt.

image
You can also move around by using the arrow keys instead of the Tab key.
Note: Flip 3D is part of the Aero experience. If your computer does not support Aero, or if you are using a theme other than a Windows 7 Aero theme, you can view the open programs and windows on your computer by pressing Alt+Tab.
If you find the traditional Alt-Tab method to be boring, the Flip 3D method is a good alternative.  The only downside is that you need to have a hardware that supports Aero.

Windows 7’s geekiest accessory: the Math Input Panel

If there is an application that is most technically savvy under the Windows 7’s accessories, the new Math Input Panel easily defeats the previously undefeated champion, the Calculator.   With Math Input panel you can easily write mathematical equations the natural way.
You read that right, now you can write equations directly into Windows 7 so it can process them and transfer them to other programs that support the MathML format (i.e. StarOffice, OpenOffice, Opera, Maple)
Math Input Panel is designed to be used with a tablet pen on a tablet PC, but you can use it with any input device, such as a touchscreen, external digitizer, or even a mouse.

How to install Windows 7 ISO

Are you a curious beginner PC user who wants to try the release candidate of Windows 7?  A release candidate is like a pre-production version so users can checkout a piece of software before it gets released officially. In this post I will show you where to get the installer and how to burn the ISO onto a bootable DVD. The latest Windows 7 RC is downloadable from Microsoft.
Here are things that you need to understand first before you install Windows 7 or a new OS for that matter.
1. You will loose your data if you reformat during installation.  Backup everything that you want to retain.
2. This is not yet an official production version.  Your PC might hang and it might not be that stable on some machines.  Expect to have some instability issues as you use it.
3.  This is only a trial software and will expire on June 1, 2010.
According to the site, here are the minimum specs for a system to run Windows 7:

The gorgeous new Windows 7 Media Center

I have been using Media Center for a long time now since I got my desktop from the store pre-installed with Windows XP Media Center edition. It offers a more immersive experience of media playing because it blows up in the entire screen and thus hiding away the distractions of all the other applications running in your screen.
When I got Windows 7, I instantly fell in love with the Media Center that came with it. Below are first glances of the updated software:

Windows 7 First Look: MS Paint

MS Paint hsa gotten a major facelift on Windows 7.  Although still aimed at basic painting needs, the updates to the interface is a clear improvement from the older Vista and XP versions.  Below is screenshot of MS Paint in Windows 7:

Rate your computers performance running Windows 7

Windows 7, like Vista, will surely strike fears in the hearts of folks who use old hardware. We all know that we will eventually need to upgrade, but the question is how much of an upgrade will that be? Will it be the whole computer or only one component? In this article, we will look at how to determine a computer’s performance index with Windows 7.
To access the tool go to the “Performance Information and Tools” under the Control Panel. By default the ratings value will contain “unrated”.

What’s new in Windows 7

Windows 7 was released to the public for beta testing recently. I downloaded the installer and put it on my 3 year old Acer Aspire with an AMD 64 X2 running at 2GHz. Installation was a breeze and I ran into a problem during the whole installation process. At first look, the desktop is stunning. I think the taskbar is more Aero than Vista Ultimate. It is more translucent and responsive. This version doesn’t have the delays I experienced in Vista.

Windows 7 Safe Mode – Advanced Boot Options

In the first two articles in this series, we explored how to restart you computer in Windows 7 Safe Mode when the F8 method won’t work and some of the options available to you on the Boot tab of the System Configuration window.
There are, however, some other boot options that although not technically part of Safe Mode, complement the Safe Mode options to enhance troubleshooting and diagnosing your computer. These options are found right next to the Safe Mode options.
To view these options, click on Start and then on Run. If you don’t have the Run command on your Start menu, hold down the Windows key on your keyboard and press the R key. Either method will bring up the Run dialog box. Type msconfig in the box and click the OK button.

Force Windows 7 to Display Verbose Information During Startup and Shutdown

Windows 7 does a good job of shielding users from irrelevant and complex goings on under the hood of the operating system. However, there are times when you need to see what is going on underneath Windows 7’s pretty exterior to troubleshoot an error during startup and shutdown. Learn how to force Windows 7 to display verbose information during startup and shutdown.

Why Display Verbose Information?

Startup and shutdown are two times when things can go wrong with Windows 7. Each installation of the operating system is unique because no two people have exactly the same hardware, software, drivers, user accounts, etc. in their PCs.
When Windows 7 starts up and shuts down, the operating system hides the loading and unloading of resources and instead displays an animation or message telling you what the O/S is doing.
If you suspect that Windows 7 is having trouble or is generating an error during this time, it would be nice if you could see all of those messages you are missing to try to fix the error.
Luckily, Microsoft does offer a way to display verbose information during startups and shutdowns. Unfortunately, the only way to force Windows 7 to display this information is with a Registry edit.
If you are unfamiliar or uncomfortable with Registry editing, don’t attempt what you are about to read. Take your PC to a professional or consult someone knowledgeable about the Windows 7 Registry.

Diagnose and Troubleshoot Windows 7 Crashes and Lock Ups

Windows 7 giving you more problems than you see fit? Constantly getting error messages like “Microsoft Word has stopped working. Ignore problem or report problem to Microsoft?”
Right, like reporting the problem to Microsoft is going to fix your computer. Getting errors like this on a constant basis is never a good thing. After all, consistency and reliability are a crucial aspect to just about anything.
With Windows 7, you can get a customized reliability report in a few easy steps. From there, you can analyze the crash reports and figure out what programs are causing the most problems with your computer.

logo

maher

Powered by Blogger